Google Web Toolkit GWT with NetBeans 7 (and 8) Tutorial
Installing GWT plugin on Netbeans:
Open Tools Menu/Plugins, go to Available Plugins tab and type GWT in the search field and proceed by clicking the Install button on the bottom left corner.

Accept the plugin even if it is signed but not trusted and restart Netbeans. GWT framework will be available now while creating a new web project.
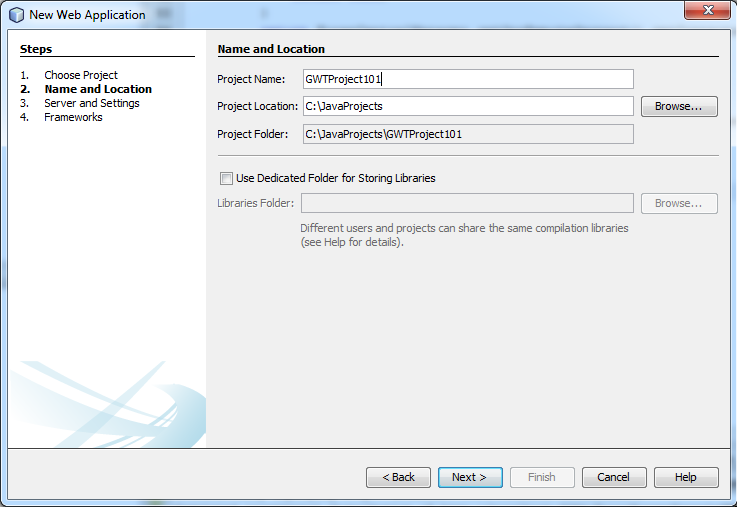
Starting a GWT Project:
To create a GWT project with Netbeans the GWT framework should be selected.

|
 |

|
 |
Unfortunately or not the generated code is a simple client-only module. Lets see what it has created for us:
 |
Notice that:
WEB-INF: web.xml No servlets have been added. This is due to being just a client-only gwt example page. The starting page is pointing at welcomeGWT.html. Most probably you will want to change this as it is quite a funny name for a serious application. Source Packages A package and a subpackage have been created: com.ramon.talavera containing a Main.gwt.xml, which is keeping the information for the entry point- com.ramon.talavera.client containing the class MainEntryPoint that implements the interface EntryPoint. More on this details later. Libraries Three libraries regarding to GWT2.5 were added. Configuration Files: gwt.properties gwt.properties informs the GWT compiler about what to compile (and how to do it). In resume: We will have to manage changes in web.xml, gwt.properties, module xml files and gwt classes. |

|
 |
EntryPoint Interface:
The EntryPoint interface forces a class to include the method onModuleLoad() making this class 'launchable' by the GWT engine:public void onModuleLoad() {
final Label label = new Label("Hello, GWT!!!");
final Button button = new Button("Click me!");
button.addClickHandler(new ClickHandler() {
public void onClick(ClickEvent event) {
label.setVisible(!label.isVisible());
}
});
RootPanel.get().add(button);
RootPanel.get().add(label);
}
A Label and a Button have been added to the RootPanel. The Widgets admit handlers that react to events:
button.addClickHandler(new ClickHandler() {
public void onClick(ClickEvent event) {
label.setVisible(!label.isVisible());
}
});
This code is quite similar to that you would write when using JAVA SWING, sure you have noticed it already, both use the same patterns.
The GWT JAVA to JavaScript Translator:
Where is the magic? There is a JAVA to JavaScript translator working during the building, GWT takes the JAVA code and builds the corresponding JavaScript version transparently. This does have advantages and disadvantages, I am agnostic, look for controversy in another place.But well, this translator has to be told where to find its target classes (Modules). And there is where gwt.properties and the modules xml configuration files come into place.
First line of gwt.properties:
# The names of the modules to compile
# (separated by a space character)
gwt.module=com.ramon.talavera.Main
This is an important to remember section, we will have to update it whenever a module is deleted by hand, and we will, as I personally do not like the Main name for our entry module... but not yet.
Module Configuration File:
Main.gwt.xml
<module>
<inherits name="com.google.gwt.user.User"/>
<entry-point class="com.ramon.talavera.client.MainEntryPoint"/>
</module>
The entry-point element indicates that the MainEntryPoint should be launched. This class must implement the EntryPoint interface, that is, include a onModuleLoad()method implementation.
Inherits informs the parser that those modules should be also included, lets include some helpful ones too:
Add:
<inherits name="com.google.gwt.logging.Logging"/>
<set-property name="gwt.logging.logLevel" value="INFO"/>
<set-property name="gwt.logging.popupHandler" value="DISABLED"/>
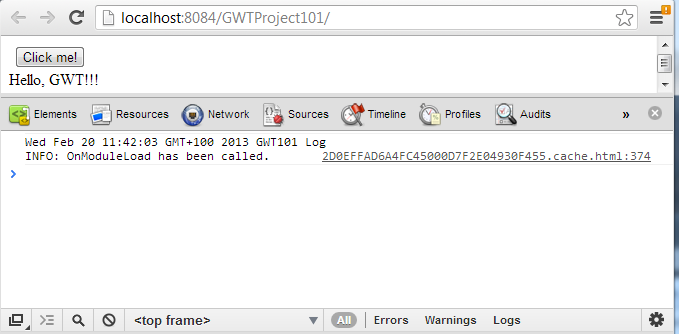
below the other inherits element so as to 'include' the gwt logger, this will allow us to write to the GWT logging console by adding:
public void onModuleLoad() {
Logger logger = Logger.getLogger("GWT101 Log");
logger.log(Level.INFO, "OnModuleLoad has been called.");
But where is this message shown?? Run the project, open the Chrome console (CTRL+SHIFT+I) and voilá:
Time to be destructive:
Ok, before doing more amusing things such as Remote Procedure Calls, after all that is what we expected from GWT, lets make several changes to the example project so as to learn how to maintain it when things get complicated.
Change the entry page name: Ok, this is basic, but somehow I had to put it here in case you did not know about this detail (man, you have read quite far if you didn't, I really expect you know what a Servlet is, if you do not, search for a Java Servlets tutorial).
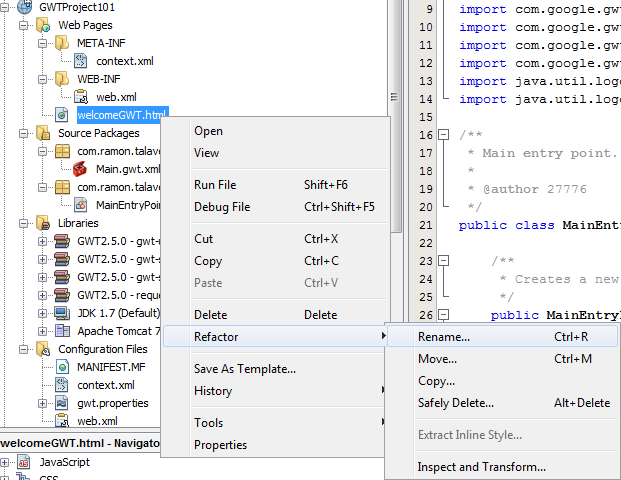 |

Easy, wasn't it... but... It did not change the information in web.xml, the <welcome-file> is still pointing at the old welcomeGWT.html, change it to GWT101index.html or whatever name you chose for your entry page.
<welcome-file-list>
<welcome-file>GWT101index.html</welcome-file>
</welcome-file-list>
This not-so-well-done automatic refactoring will occur whenever module names are changed, and will affect web.xml, making it a little bit complicated to change a remote service name (module)... keep it in your mind.
Changing a Client Class Name:
Let's change the MainEntryPoint class and corresponding xml names to GWT101EntryPoint...
1- Rename MainEntryPoint.java to GWT101EntryPoint.java
2- Rename Main.gwt.xml to GWT101.gwt.xml
2.5- Beware: GWT101.gwt.xml has to point now to com.ramon.talavera.client.GWT101EntryPoint
Open GWT101.gwt.xml and change the line
<entry-point class="com.ramon.talavera.client.MainEntryPoint"/>
to:
<entry-point class="com.ramon.talavera.client.GWT101EntryPoint"/>
3- The web page contents have to be updated to launch the renamed class:
change:

to:

And also remember to change gwt.properties so that the translator finds the new module's xml configuration file.
# The names of the modules to compile
# (separated by a space character)
gwt.module=com.ramon.talavera.GWT101
Quite messy, isn't it? this will get a little bit more complicated when remote servicing is present, as also servlet names in web.xml will change. Make sure you understood the process as renaming gwt modules is quite a common procedure that takes part while refactoring.
Time to be Constructive:
Time to do the right thing right, a client capable of communicate with the server (and, unfortunately yet, not the other way round, no full duplex here). GWT Modules can send requests to the server in a Remote Process Call manner, that is, as if they were 'normal' function calls from a syntax point of view. The client-user interaction will not be completely blocked while this communication is being done, that is, GWT does make asynchronous calls.
The elements in this game are:
0- An Entry Point. As explained before.
1- The Client GUI acts as a Client of a Service that offers its remote functionality by implementing an expected interface. This functionality is asynchronous and directly offered by a hidden and autogenerated proxy.
2- The Server, whose implementation respects an interface defining all the methods that the client expects the server to accomplish, this interface is shared by client and server as if it were local to both.
In fact 0 and 1 can be merged, a User Interface element can implement the EntryPoint interface directly.

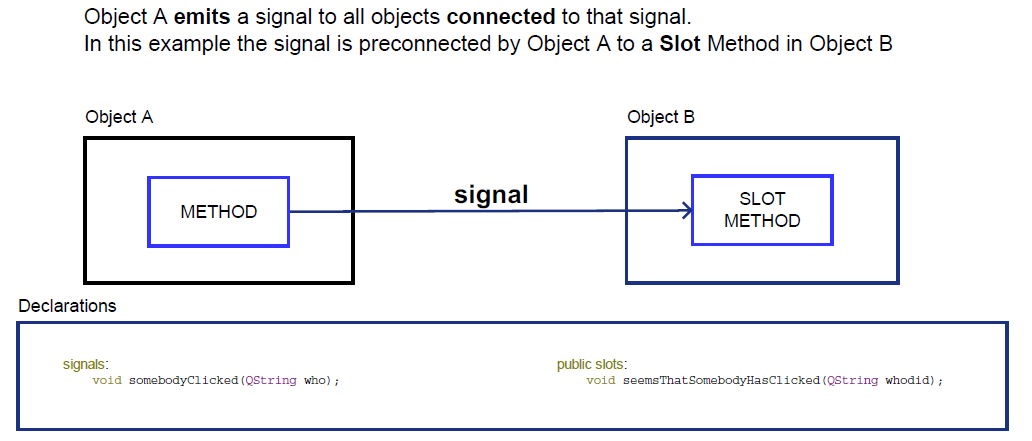
Lets resume this nifty diagram, lets focus on the ClientUIModule, our visual module, it does have to implement a written-by-us interface named OurServiceMethods. On the other side, the ServerImplementation implements the same OurServiceMethods interface. Once both are in agreement a <<Hidden>> proxy is generated that complies the interface OurServiceMethodAsync, also written by us and very similar to the original OurServiceMethodsInterface, but written in a async-friendly way.
The ClientUIModule 'uses' the remote methods by 'getting' the service from a very easy-to-code method:
public static OurServiceMethodsAsync getService() {
return GWT.create(ClientUIModule.class);
}
The rest of the element of the diagram are <<Hidden>> and <<Autogenerated>> so no need to be afraid of them at least at this point.
An enlightening absurd example:
RTubbies are cute remote beings that live in a wonderful remote land called ServerWorld, their names are:
[ STinkyWanky, Deepsy, OLaLa, Poo] our service methods will allow us to recover a random RTubbie name and tell them to jump by name.
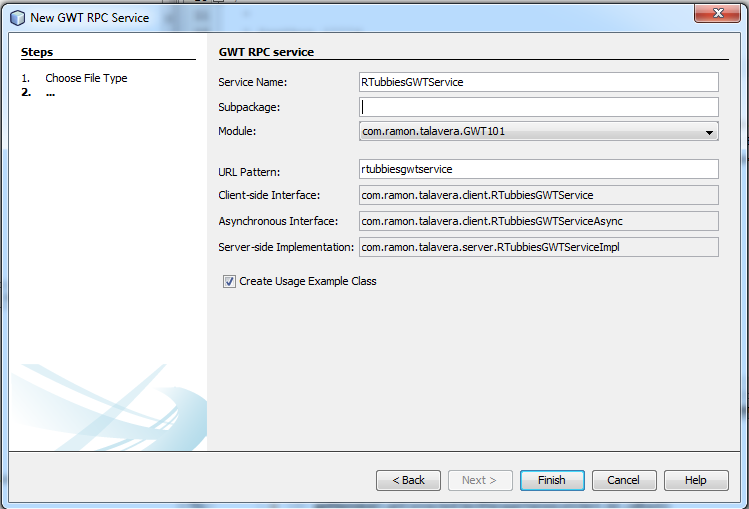
Lets create the this by using Netbeans Wizards, I will move classes from the packages generated by the wizard to improve understandability.
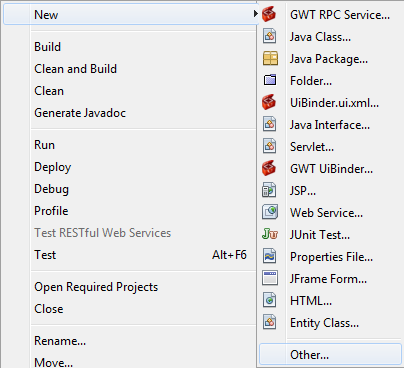
Right-Click the GWTProject101 icon and choose New/Other
 |
 |
|
|
Lets integrate RTubbiesGWTServiceUsageExample, wich is an autogenerated visual vertical pannel into our existing exampe: GWT101EntryPoint.java. Update the onModuleLoad() of GWT101EntryPoint.java to include this panel into the RootPanel by adding the lines:
RTubbiesGWTServiceUsageExample rtubbiesGWT101Example=new RTubbiesGWTServiceUsageExample();
RootPanel.get().add(rtubbiesGWT101Example);
The resulting new method code:
public void onModuleLoad() {
Logger logger = Logger.getLogger("GWT101 Log");
logger.log(Level.INFO, "OnModuleLoad has been called.");
final Label label = new Label("Hello, GWT!!!");
final Button button = new Button("Click me!");
/* Create a RTubbiesGWTServiceUsageExample which is a Vertical panel*/
RTubbiesGWTServiceUsageExample rtubbiesGWT101Example=new RTubbiesGWTServiceUsageExample();
button.addClickHandler(new ClickHandler() {
public void onClick(ClickEvent event) {
label.setVisible(!label.isVisible());
}
});
/* Add out created RTubbiesGWTServiceUsageExample to the rootpanel*/
RootPanel.get().add(rtubbiesGWT101Example);
RootPanel.get().add(button);
RootPanel.get().add(label);
}
This now should be as easy as launching the application... but an error appears:
[ERROR] Unable to find 'com/ramon/talavera/client/RTubbiesGWTServiceUsageExample.gwt.xml' on your classpath; could be a typo, or maybe you forgot to include a classpath entry for source?
[ERROR] Line 19: Unexpected exception while processing element 'inherits'
So the GWT code translator is asking you to inform of the existence of the new used class, for that we need to update GWT101.gwt.xml: and add a new
<inherits name="com.ramon.talavera.client.RTubbiesGWTServiceUsageExample"/>
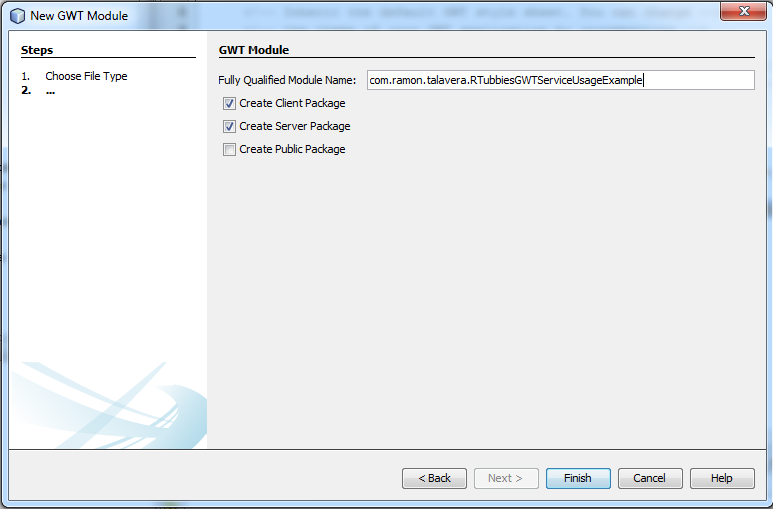
entry before the entry-point element. But we also have to inform about this class imforming that it is a GWT Module in com.ramon.talavera.client:
 |
 |
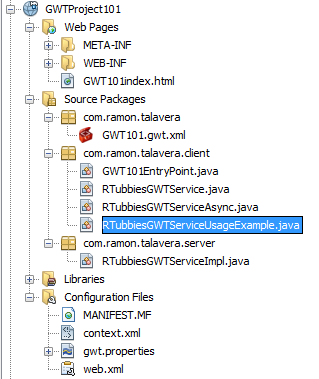
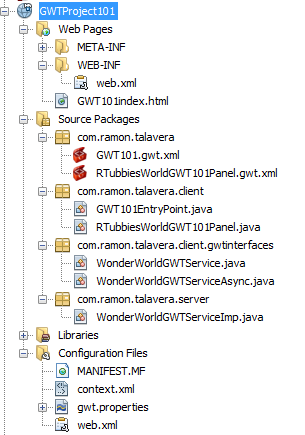
Lets have a look at the project structure at this point:

Renaming a Client:
Well, I personally do not like that module being named "RTubbiesGWTServiceUsageExample" , I would like to rename it to a more appealing-to-me name, such as: "RTubbiesWorldGWT101Panel", but getting it done will not be as easy as it seems and will let us discover a some details of what is going on under the hood of GWT.We first rename the client from RTubbiesGWTServiceUsageExample to RTubbiesWorldGWT101Panel,
remember to update the inherits line to point to the new name:
<inherits name="com.ramon.talavera.RTubbiesWorldGWT101Panel"/>
and rename the RTubbiesGWTServiceUsageExample.gwt.xml to RTubbiesWorldGWT101Panel.gwt.xml
and (ops!) do it also in gwt.properties.
# The names of the modules to compile (separated by a space character)
gwt.module=com.ramon.talavera.GWT101 com.ramon.talavera.RTubbiesWorldGWT101Panel
The project now looks as follows:

Renaming a Service:
The basic idea for understanding what has to be done to rename a service is realising that it does correspond to a Servlet in the container. So renaming a service includes making changes to WEB-INF/web.xml.Let's have a look at its current contents:
<?xml version="1.0" encoding="UTF-8"?>
<web-app version="3.0" xmlns="http://java.sun.com/xml/ns/javaee" xmlns:xsi="http://www.w3.org/2001/XMLSchema-instance" xsi:schemaLocation="http://java.sun.com/xml/ns/javaee http://java.sun.com/xml/ns/javaee/web-app_3_0.xsd">
<servlet>
<servlet-name>RTubbiesGWTService</servlet-name>
<servlet-class>
com.ramon.talavera.server.RTubbiesGWTServiceImpl
</servlet-class>
</servlet>
<servlet-mapping>
<servlet-name>RTubbiesGWTService</servlet-name>
<url-pattern>/com.ramon.talavera.GWT101/rtubbiesgwtservice</url-pattern>
</servlet-mapping>
<session-config>
<session-timeout>
30
</session-timeout>
</session-config>
<welcome-file-list>
<welcome-file>GWT101index.html</welcome-file>
</welcome-file-list>
</web-app>
So for a Service whose name is Xyz two corresponding interfaces are being used Xyz and XyzAsync and an implementation XyzImp.
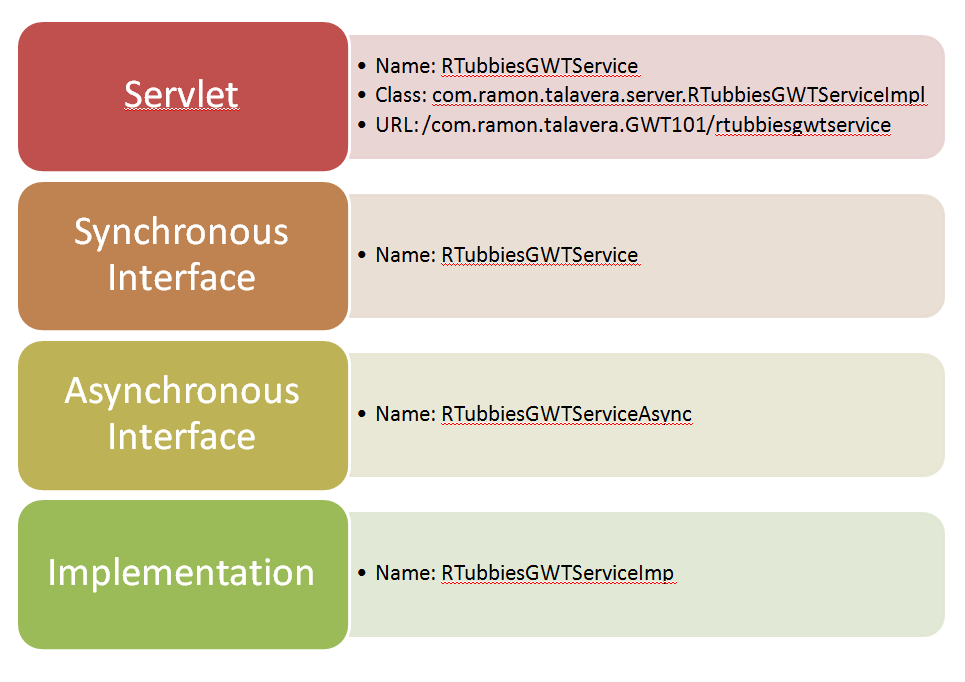
So all this stuff have to change its name to the new one. In our case we are going to rename RTubbiesGWTService to WonderWorldGWTService:
| RTubbiesGWTService | WonderWorldGWTService |
| RTubbiesGWTServiceAsync | WonderWorldGWTServiceAsync |
| RTubbiesGWTServiceImpl | WonderWorldGWTServiceImp |
<servlet>
<servlet-name>WonderWorldGWTService</servlet-name>
<servlet-class>com.ramon.talavera.server.WonderWorldGWTServiceImp</servlet-class>
</servlet>
<servlet-mapping>
<servlet-name>WonderWorldGWTService</servlet-name>
<url-pattern>/com.ramon.talavera.GWT101/rtubbiesgwtservice</url-pattern>
</servlet-mapping>
But we also want that /rtubbiesgwtservice in the URL pattern to be changed to wonderworldgwtservice this relative path is indicated into the service interface: WonderWorldGWTService.java:
@RemoteServiceRelativePath("rtubbiesgwtservice")
public interface WonderWorldGWTService extends RemoteService {
public String myMethod(String s);
}
Change that rtubbiesgwtservice to wonderworldgwtservice and do it also in web.xml.
|

|

|
Run the project, all should be working and the server should echo just whatever you send to it as a response.

Adding the Desired Functionality to our Service:
Once the project structure has been set, adding the functionality is not difficult at all. Examples are that, examples, so I chose an absurd one:
"RTubbies are cute remote beings that live in a wonderful remote land called ServerWorld, their names are:
[ STinkyWanky, Deepsy, OLaLa, Poo] our service methods will allow us to recover a random RTubbie name and tell them to jump by name."
To achieve our 'goal' we will have to define the interface first and then its implementation in the server and client. Lets improve the example by making GWT pass complex typex through the line by serialization, ladies and gentlemen, the RTubbie definition:
To make the class definition easy to be found by the GWT compiler, I placed it as a subpackage of the client package: com.ramon.talavera.client.wonderland. The class has to be Serializable.
package com.ramon.talavera.client.wonderland;
import java.io.Serializable;
public class RTubbie implements Serializable{
private String name;
public String getName() {
return name;
}
public void setName(String name) {
this.name = name;
}
}
The synchronous interface includes now the new method public RTubbie recoverRandomRTubbie();
package com.ramon.talavera.client.gwtinterfaces;
import com.google.gwt.user.client.rpc.RemoteService;
import com.google.gwt.user.client.rpc.RemoteServiceRelativePath;
import com.ramon.talavera.client.wonderland.RTubbie;
@RemoteServiceRelativePath("wonderworldgwtservice")
public interface WonderWorldGWTService extends RemoteService {
public RTubbie recoverRandomRTubbie();
}
package com.ramon.talavera.client.gwtinterfaces;
import com.google.gwt.user.client.rpc.AsyncCallback;
import com.ramon.talavera.client.wonderland.RTubbie;
public interface WonderWorldGWTServiceAsync {
public void recoverRandomRTubbie(
AsyncCallback<RTubbie> callback);
}
This forces the RemoteServiceServlet to include the implementation of the corresponding recoverRandomRTubbie method. Note for the 'expert' reader: yes, the RTubbies list could have been passed in an IOC way, but it was not, just because.
package com.ramon.talavera.server;
import com.google.gwt.user.server.rpc.RemoteServiceServlet;
import com.ramon.talavera.client.gwtinterfaces.WonderWorldGWTService;
import com.ramon.talavera.client.wonderland.RTubbie;
import java.util.ArrayList;
import java.util.List;
import java.util.Random;
public class WonderWorldGWTServiceImp extends RemoteServiceServlet implements WonderWorldGWTService {
private List<RTubbie> wonderlist;
private Random randomGenerator;
public WonderWorldGWTServiceImp()
{
randomGenerator = new Random();
wonderlist=new ArrayList<RTubbie>();
RTubbie rtb=new RTubbie();
rtb.setName("Stinky Wanky");
wonderlist.add(rtb);
rtb=new RTubbie();
rtb.setName("Deepsy");
wonderlist.add(rtb);
rtb=new RTubbie();
rtb.setName("OLaLa");
wonderlist.add(rtb);
rtb=new RTubbie();
rtb.setName("Poo");
wonderlist.add(rtb);
}
@Override
public RTubbie recoverRandomRTubbie() {
int random=randomGenerator.nextInt(4);
return wonderlist.get(random);
}
}
The client invokes the server's recoverRandomRTubbie() and gets, well, a RTubbie.
public static WonderWorldGWTServiceAsync getService() {
return GWT.create(WonderWorldGWTService.class);
}
To invoke the recoverRandomTubbie we will need a callback method, as this is asynchronous and the RTubbie will not be present until it is fully received by the client, lets define a callback method to handle that:
//Callback methods:
final AsyncCallback<RTubbie> callback = new AsyncCallback<RTubbie>() {
@Override
public void onSuccess(RTubbie result) {
lblServerReply.setText(
result.getName()+" came to you.");
}
@Override
public void onFailure(Throwable caught) {
lblServerReply.setText("Communication failed");
}
};
So to get the RTubbie:
getService().recoverRandomRTubbie(callback);
This call will be done and the callback method invoked as soon as the result has been received by the client. In our example the corresponding call is done when the button is clicked, so it was added into a ClickHandler.
btnSend.addClickHandler(new ClickHandler() {
@Override
public void onClick(ClickEvent event) {
getService().recoverRandomRTubbie(callback);
}
});
Covering the second functionality is obvious and left as an exercise for the reader.
package com.ramon.talavera.client;
import com.google.gwt.core.client.GWT;
import com.google.gwt.event.dom.client.ClickEvent;
import com.google.gwt.event.dom.client.ClickHandler;
import com.google.gwt.user.client.rpc.AsyncCallback;
import com.google.gwt.user.client.ui.Button;
import com.google.gwt.user.client.ui.Label;
import com.google.gwt.user.client.ui.VerticalPanel;
import com.ramon.talavera.client.gwtinterfaces.WonderWorldGWTService;
import com.ramon.talavera.client.gwtinterfaces.WonderWorldGWTServiceAsync;
import com.ramon.talavera.client.wonderland.RTubbie;
public class RTubbiesWorldGWT101Panel extends VerticalPanel {
private Label lblServerReply = new Label();
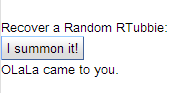
private Button btnSend = new Button("I summon it!");
public RTubbiesWorldGWT101Panel() {
add(new Label("Recover a Random RTubbie: "));
add(btnSend);
add(lblServerReply);
btnSend.addClickHandler(new ClickHandler() {
@Override
public void onClick(ClickEvent event) {
getService().recoverRandomRTubbie(callback);
}
});
}
public static WonderWorldGWTServiceAsync getService() {
return GWT.create(WonderWorldGWTService.class);
}
//Callback methods:
final AsyncCallback<RTubbie> callback = new AsyncCallback<RTubbie>() {
@Override
public void onSuccess(RTubbie result) {
lblServerReply.setText(
result.getName()+" came to you.");
}
@Override
public void onFailure(Throwable caught) {
lblServerReply.setText("Communication failed");
}
};
}
 Impressive, isn't it?
A Netbeans project is available at: GWTProject101.zip
Hope you enjoyed this tutorial. Any comments are welcome: ramon.talavera@gmail.com
See you next time :).
To achieve our 'goal' we will have to define the interface first and then its implementation in the server and client. Lets improve the example by making GWT pass complex typex through the line by serialization, ladies and gentlemen, the RTubbie definition:
To make the class definition easy to be found by the GWT compiler, I placed it as a subpackage of the client package: com.ramon.talavera.client.wonderland. The class has to be Serializable.
package com.ramon.talavera.client.wonderland;
import java.io.Serializable;
public class RTubbie implements Serializable{
private String name;
public String getName() {
return name;
}
public void setName(String name) {
this.name = name;
}
}
The synchronous interface includes now the new method public RTubbie recoverRandomRTubbie();
package com.ramon.talavera.client.gwtinterfaces;
import com.google.gwt.user.client.rpc.RemoteService;
import com.google.gwt.user.client.rpc.RemoteServiceRelativePath;
import com.ramon.talavera.client.wonderland.RTubbie;
@RemoteServiceRelativePath("wonderworldgwtservice")
public interface WonderWorldGWTService extends RemoteService {
public RTubbie recoverRandomRTubbie();
}
The asynchronous interface receives the 'asynchronous' version of the same method, written in a fancy style, returning void and receiving the callback method that will be invoked once the RTubbie has reached its final destination: public void recoverRandomRTubbie(AsyncCallback<RTubbie> callback);
package com.ramon.talavera.client.gwtinterfaces;
import com.google.gwt.user.client.rpc.AsyncCallback;
import com.ramon.talavera.client.wonderland.RTubbie;
public interface WonderWorldGWTServiceAsync {
public void recoverRandomRTubbie(
AsyncCallback<RTubbie> callback);
}
This forces the RemoteServiceServlet to include the implementation of the corresponding recoverRandomRTubbie method. Note for the 'expert' reader: yes, the RTubbies list could have been passed in an IOC way, but it was not, just because.
Server Implementation:
package com.ramon.talavera.server;
import com.google.gwt.user.server.rpc.RemoteServiceServlet;
import com.ramon.talavera.client.gwtinterfaces.WonderWorldGWTService;
import com.ramon.talavera.client.wonderland.RTubbie;
import java.util.ArrayList;
import java.util.List;
import java.util.Random;
public class WonderWorldGWTServiceImp extends RemoteServiceServlet implements WonderWorldGWTService {
private List<RTubbie> wonderlist;
private Random randomGenerator;
public WonderWorldGWTServiceImp()
{
randomGenerator = new Random();
wonderlist=new ArrayList<RTubbie>();
RTubbie rtb=new RTubbie();
rtb.setName("Stinky Wanky");
wonderlist.add(rtb);
rtb=new RTubbie();
rtb.setName("Deepsy");
wonderlist.add(rtb);
rtb=new RTubbie();
rtb.setName("OLaLa");
wonderlist.add(rtb);
rtb=new RTubbie();
rtb.setName("Poo");
wonderlist.add(rtb);
}
@Override
public RTubbie recoverRandomRTubbie() {
int random=randomGenerator.nextInt(4);
return wonderlist.get(random);
}
}
The client invokes the server's recoverRandomRTubbie() and gets, well, a RTubbie.
Client Implementation:
First of all we need a method to expose the service remote methods expressed as local calls, so a proxy is created. Fortunately this is all done by GWT and writing that method is really easy:public static WonderWorldGWTServiceAsync getService() {
return GWT.create(WonderWorldGWTService.class);
}
To invoke the recoverRandomTubbie we will need a callback method, as this is asynchronous and the RTubbie will not be present until it is fully received by the client, lets define a callback method to handle that:
//Callback methods:
final AsyncCallback<RTubbie> callback = new AsyncCallback<RTubbie>() {
@Override
public void onSuccess(RTubbie result) {
lblServerReply.setText(
result.getName()+" came to you.");
}
@Override
public void onFailure(Throwable caught) {
lblServerReply.setText("Communication failed");
}
};
So to get the RTubbie:
getService().recoverRandomRTubbie(callback);
This call will be done and the callback method invoked as soon as the result has been received by the client. In our example the corresponding call is done when the button is clicked, so it was added into a ClickHandler.
btnSend.addClickHandler(new ClickHandler() {
@Override
public void onClick(ClickEvent event) {
getService().recoverRandomRTubbie(callback);
}
});
Covering the second functionality is obvious and left as an exercise for the reader.
package com.ramon.talavera.client;
import com.google.gwt.core.client.GWT;
import com.google.gwt.event.dom.client.ClickEvent;
import com.google.gwt.event.dom.client.ClickHandler;
import com.google.gwt.user.client.rpc.AsyncCallback;
import com.google.gwt.user.client.ui.Button;
import com.google.gwt.user.client.ui.Label;
import com.google.gwt.user.client.ui.VerticalPanel;
import com.ramon.talavera.client.gwtinterfaces.WonderWorldGWTService;
import com.ramon.talavera.client.gwtinterfaces.WonderWorldGWTServiceAsync;
import com.ramon.talavera.client.wonderland.RTubbie;
public class RTubbiesWorldGWT101Panel extends VerticalPanel {
private Label lblServerReply = new Label();
private Button btnSend = new Button("I summon it!");
public RTubbiesWorldGWT101Panel() {
add(new Label("Recover a Random RTubbie: "));
add(btnSend);
add(lblServerReply);
btnSend.addClickHandler(new ClickHandler() {
@Override
public void onClick(ClickEvent event) {
getService().recoverRandomRTubbie(callback);
}
});
}
public static WonderWorldGWTServiceAsync getService() {
return GWT.create(WonderWorldGWTService.class);
}
//Callback methods:
final AsyncCallback<RTubbie> callback = new AsyncCallback<RTubbie>() {
@Override
public void onSuccess(RTubbie result) {
lblServerReply.setText(
result.getName()+" came to you.");
}
@Override
public void onFailure(Throwable caught) {
lblServerReply.setText("Communication failed");
}
};
}
A Netbeans project is available at: GWTProject101.zip
Hope you enjoyed this tutorial. Any comments are welcome: ramon.talavera@gmail.com

Comments
Post a Comment